SXP Directory

SXP Directory

  • Twitter
  • Community
    • Social
    • Services
    • AMAs
    • Events 
    • Art
  • Delegate
  • Develop
  • Media
    • Blogs 
    • Press
    • Articles
    • Videos
    • Podcasts
  • Solar.org
  • Apps
  • SXPViet
  • Swap SXP
  • Stake SXP
  • SXPFAH

Archives for April 2022

ERC20 BEP20-to-Native SXP Swap Guide

April 2, 2022 by arktoshi Leave a Comment

This is a detailed guide on how to swap SXP from ERC-20/BEP-20 network to native SXP on the Solar blockchain. The article is long and detailed but very easy to understand and simple for most crypto enthusiasts.

Notes

  • Please read the steps carefully, although some of it is not necessary, it does ensure that your property won’t be lost.
  • To swap SXP, you need small amount of BNB if you swap from the Binance Smart Chain network, and small amount of ETH if you swap from the Ethereum network. It is recommended to use the Binance Smart Chain network because the transaction fees are very cheap.
  • Solar’s official swap page is at: https://swap.solar.org/ ✅, check it out one more time at the URL bar. All other sites claiming to be SXP swap portals are very likely to scam!🚨
  • If you’ve just created a Metamask wallet or Solar wallet. PLEASE SAVE THE PRIVATE KEY CAREFULLY!

Create a Metamask Wallet

(Skip this step if you already have a Metamask wallet and are familiar with the Metamask wallet)

Metamask wallet is one of the extremely popular wallets, supporting the Ethereum network and other Layer 1 forks out of Ethereum like Binance Smart Chain or Polygon. Metamask will act as a wallet for the BEP20/ERC20 network SXP during the swap.

Use Chrome browser (or Chromium-based web browsers like Microsoft Edge, Brave) to download Metamask. Metamask also supports Firefox browser.

  • Chrome extension: Link
  • Firefox exension: Link

Click ‘Add to Chrome‘ button to download the wallet.

Once downloaded, Metamask will appear on the utility toolbar, click Metamask icon then click Get Started.

Next there will be a dialog asking if you already have a wallet, if you want to create a new wallet, select Create a Wallet, or if you already have a wallet, select Import Wallet. Here I will choose to Create a Wallet.

After clicking, you will be asked to set a password, enter your password and then tick ‘I have read and agree to the ‘Terms of Use‘ and click ‘Create‘.

Next will be the important part, you will be navigated to this screen, click on the shaded frame, 12 Secret Recovery Passphrase will be displayed, please write down these 12 words carefully on a piece of paper and keep them safe. After recording, click Next.

The next screen will ask you to enter the correct order of the 12 Secret Recovery Passphrase, click on the word in the order you just saved and press Confirm.

If the next screen displays Congratulations like this, it means you have successfully created the wallet, click All Done .

Add BSC network to Metamask

If you intend to withdraw SXP to the Binance Smart Chain (BEP20) network, then continue with this step, otherwise if you intend to withdraw SXP to the Ethereum network (ERC20), you can skip it.

First, click the Metamask icon in the utility toolbar, a dialog box will open, continue to click on the avatar and select Settings.

Next, select Network

Next select Add Network

A new tab will be opened, please fill the following values.

  • Network Name:  Smart Chain
  • New RPC URL (New RPC URL):  https://bsc-dataseed.binance.org/
  • ChainID:  56
  • Symbol:  BNB
  • Block Explorer URL:  https://bscscan.com

After entering done, then click Save

Now that you can use the BSC network on Metamask, check by selecting the network next to the avatar and check if there is a “Smart Chain”.

Pay attention to the main item in the middle of the screen, that is your Metamask BEP-20 wallet address, click on it to copy and write down it, we will need it later.

Add Contract SXP to Metamask

At the Metamask screen, click the Import Tokens button

Now you need to enter the corresponding network. You can verify the contract addresses on Coinmarketcap.

If you use the Binance Smart Chain network , enter:

  • Token contract address: 0x47bead2563dcbf3bf2c9407fea4dc236faba485a
  • Token Symbol: SXP
  • Token Decimals: 18

If you are on the Ethereum network , enter:

  • Token contract address: 0x8CE9137d39326AD0cD6491fb5CC0CbA0e089b6A9
  • Token Symbol: SXP
  • Token Decimals: 18

Then select “ Add Custom Token ”

Continue to Import Tokens

So you have finished importing the contract of SXP into your wallet, now if you store SXP in your wallet, you will be able to check the SXP balance.

Withdraw SXP from Binance to Metamask

Go to your Fiat and Spot wallet on Binance, choose to withdraw SXP.

Next, select the withdrawal network. In this guide, we choose withdraw SXP to the Binance Smart Chain network (BEP20), if you want to withdraw to Ethereum network , choose ERC20 (Note that Ethereum network transaction fees will be very high).

Then fill your Metamask wallet address and amount you want to withdraw, click Withdraw.

It’s time to review and confirm your withdrawal. Submit security codes sent to your mobile device, email and 2FA code (if you enabled it).

SXP (BEP-20 network) will arrive your Metamask wallet in few minutes! Eureka!

Create a Solar wallet

How to Create SXP Wallet

Just like when creating a Metamask wallet, YOU MUST KEEP CAREFULLY PRIVATE KEY/SEED WORDS/PASSPHRASE INCLUDE 12 OR 24 WORDS.

Swap SXP

Note: keep some BNB if you swap from BSC, and some ETH if you swap from Ethereum.

Go to https://swap.solar.org/ , click Next and select Connect with Metamask .

The dialog box asking if you want to connect the wallet to the swap.solar.org site will appear, click Next and Connect .

The web interface will now change, you will be asked to select the network of the SXP you want to transfer. Here I use BSC network because I withdraw SXP to BSC network. Then click “ Next ”.

Next, you will be asked how much SXP you want to swap, I will swap all my SXP here. If you’re careful, try swapping with 1 SXP to see if it works, then swap all the rest.

Next you will be asked for your SXP Mainnet (native) wallet address , get your wallet address from Solar Wallet and fill it in, if the wallet address is correct, the input box will turn green. Next, just click Next.

Swap will ask you to Approve swap , click and Metamask will appear, however, to make sure this is the official Solar Swap page, watch out for this line. Check and make sure that the contracts are 0x44Cf30Ea4E58818BfaE4b8499Be409CD4fDd5a20 if you’re swapping from the BSC network or 0x71f755a78fd1e044ebf38ab6876700a907fc53a if you’re swapping from the ETH network .
If it is correct, you can safely press Confirm .

Then, in the Swap page interface, you will see the Approve Swap button will become Swap now . Click on that, Metamask will appear again, check the contracts are 0x44Cf30Ea4E58818BfaE4b8499Be409CD4fDd5a20 for BSC and 0x71f7505a78fd1e044ebf38ab6876700a907fc53a for ETH . If correct, select Confirm

At this time, the swap officially starts, your job is to wait for 5-10 minutes for the SXP from the BSC/ETH network to be sent to your Solar wallet. You can see transaction details on Explorer at the ” click here ” button on the interface.

Good luck and be careful in checking the URL, wallet address, and contract address.

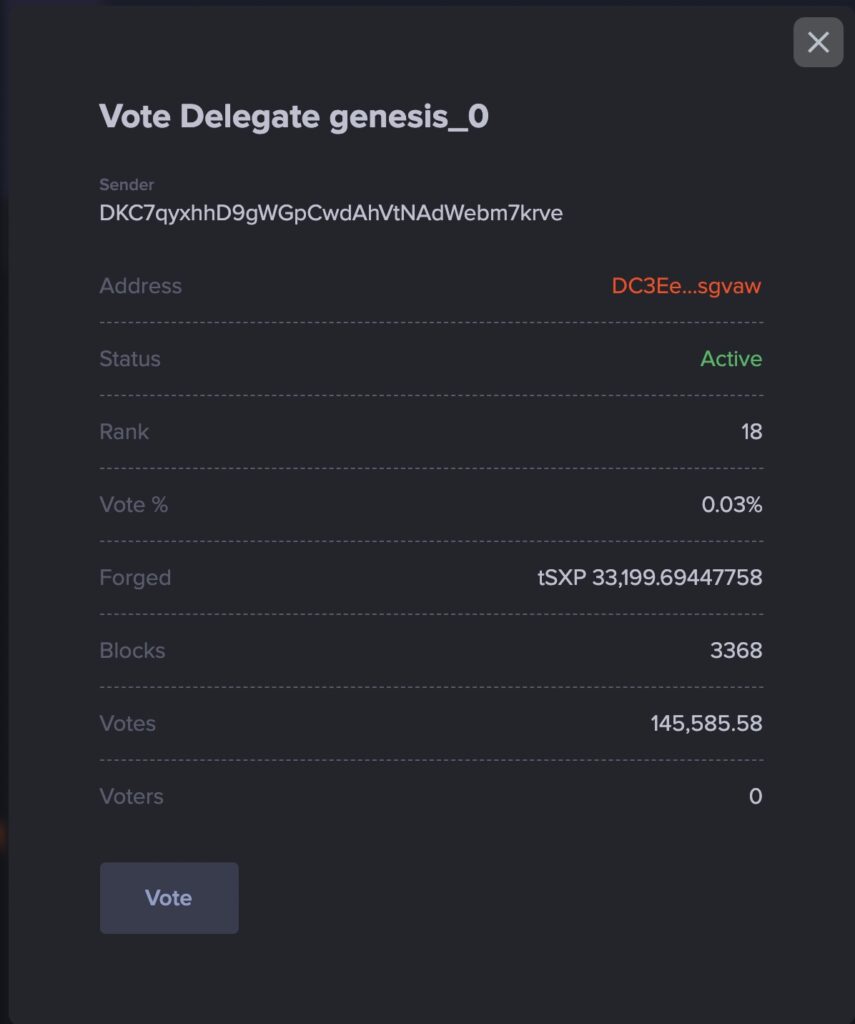
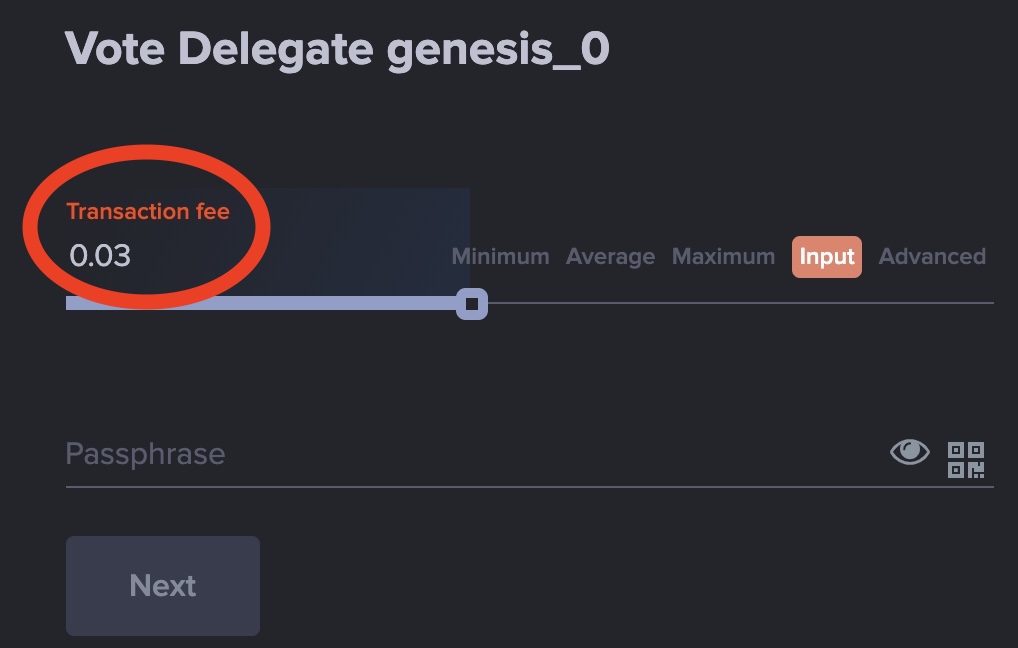
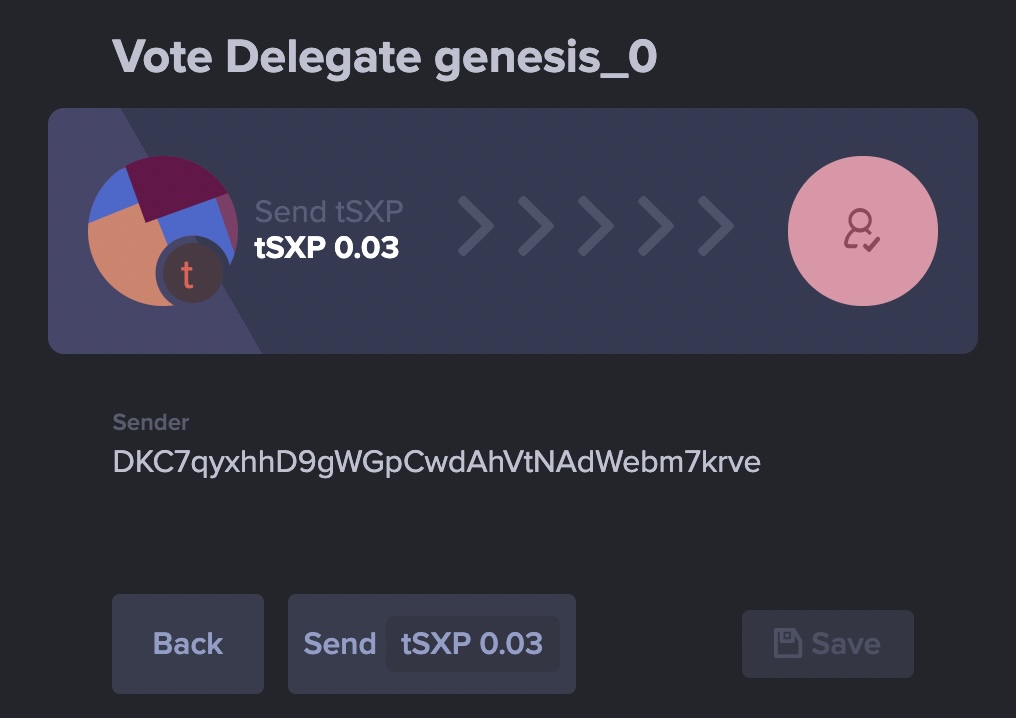
If this guide is helpful to you, consider voting for Delegate arktoshi and Delegate fonk! Thank you!

Filed Under: Guides Tagged With: bep20 sxp, erc20 sxp, swap sxp, sxp native, sxp solar

How to Stake SXP choose delegates and earn staking rewards

April 2, 2022 by arktoshi 1 Comment

Complete guide to staking SXP, how to earn passive income with SXP coins, and why SXP is a smart investment.

What is SXP

What is SXP voting?

Solar uses DPoS for consensus, which requires users to vote for delegates, who will consequentially take part in the transaction verification and block propagation process. Relay nodes are used for storing the full copy of the blockchain, connected nodes list, and running the blockchain as a whole.

The Delegate nodes consist of one or multiple relay nodes, and a forger component, which verifies, signs, and propagates new transactions. Unlike many other blockchains, Solar only allows voting for one delegate from an address.

What are Solar Delegates?

Solar Delegates verify transactions and run dApps calculations, and get rewards from transaction fees, which are shared back with the users who lease to them. The Delegates also incorporate a relay node that stores the full blockchain history and can provide transaction details in a matter of seconds.

Solar requires a powerful computer with a stable Internet connection, and a stake of 3 million SXP coins to run a node, so solo staking is not a viable option for most network users. Instead, they lease their stakes to other nodes to take part in the process and get rewarded.

How profitable is SXP Voting?

SXP provides a stable yield of around 10% annually to all delegators that take part in the voting process. Yearly returns are somewhere around 8-12%, depending on which delegate you choose to vote for as different delegates pay out different amounts.

Step-by-step SXP Voting guide

Step 1 . Access the SXP wallet, and click on Delegates. (If you haven’t created a SXP wallet, read the instructions here)

Step 2 . Click on the delegate you want to vote for, if you don’t see them in the list, click Search delegates then enter the delegate name.

Notice

In this example, we vote for delegate genesis_0. There are many delegates to choose from, each delegate has different contributions and different rewards sharing ratios. Read the proposals of the delegates and choose your favorite: delegates.solar.org

As for you, which delegate you like to vote for? Select the delegate by entering their name. Then click Confirm.

An information panel about the delegate will appear including the delegate’s name, the number of votes, and the delegate rank, …… Click Vote to continue.

Step 3. The system suggests fees to complete this vote transaction. However, the suggestions given are often quite high, while just putting in the magic number 0.03 SXP is enough for almost transactions.

If you follow this step correctly, you will save a bit of SXP, congratulations! Continue to enter the passphrase in the box below and click Next .

Step 4 . Once again check whether the delegate information and the transaction fee are correct; then click Send. Wait about 5 seconds for the tx to be broastcasted on the blockchain.

The screen will display a successful delegate voting process similar to this

Congratulations! You have completed the voting delegate process. After voting for the delegate, you will receive a daily reward from the delegate you elected. Some delegates share rewards every 24 hours, others share every 3 or 7 days. Read the delegate proposals carefully to know more about them.

If the information on this website is helpful to you, consider voting for Delegate arktoshi! Thank you! Happy staking! 🔥

Filed Under: Guides Tagged With: stake sxp, stake sxp guide, stake sxp solar, sxp staking, sxp staking guide

How to Create SXP Wallet

April 2, 2022 by arktoshi 3 Comments

SXPViet will guide you to create an SXP (Solar) wallet in the simplest and most secure way by using the official Solar Desktop Wallet application released by the Solar team. Before you get started, pay attention to the following to ensure your SXP wallet is 100% secure.

Notes

  1. Solar Desktop Wallet: only download the application from the official website Solar.org ✅
  2. Please keep the passphrase carefully in a safe place, absolutely do not share it with anyone. If you lose your passphrase, you will lose control of your SXP wallet🚨

Create SXP Solar wallet

Download and install Solar Desktop Wallet

Visit the following link to download Solar Desktop Wallet: https://solar.org/desktop-wallet

Solar Desktop Wallet application fully supports popular operating systems including Windows, macOS, Ubuntu/Debian. After downloading, install this application as usual.

Create profile and create SXP Solar wallet

Create a personal profile

Step 1 . Open the Solar Desktop Wallet app. It takes a few seconds to enter the application.

Step 2. The first time you install and use Solar Desktop Wallet, you will see some instructions and an introduction about the wallet, which you can skip by clicking Skip/Next.

Next, we start creating profiles. You can create many different profiles. In the profile creation section, enter the following information:

  • Profile Name : the name of the profile, for example in this tutorial is SXPDirectory.com. You can name your profile whatever you want.
  • Currency : the currency displayed in the application
  • Passphrase Language (BIP39): English
  • Network : Solar Mainnet
  • Price chart : show SXP price in dashboard or not
  • Theme : light or dark display style
  • Background : choose a wallpaper for the application in the available photo store

That’s it, creating a Personal Profile, next to the step of create SXP wallet .

Create SXP Solar wallet

Step 1. Click on the wallet icon in the left toolbar, then click on Create Wallet.

Step 2. The system will randomly generate many SXP wallet addresses for you to choose from. Select an address you want and then click Next .

Step 3. This is a very important step, please write down the passphrase (12 words) and keep it carefully! You should write them down and keep them in a safe place. Do not save the passphrase on your computer or on the Internet. 🚨🚨🚨 (if you want to copy 12 keywords, click on the Copy to clipboard icon ).

After storing the passphrase carefully, check again to see if you have recorded it correctly. If you are sure that you have recorded the correct passphrase, then click Next to proceed to the verification step. ✅

Step 4 . This is the step to verify whether you have saved the passphrase carefully or not? Please click on the correct keywords in the order 3, 6 and 9. After you have selected the correct keywords, click Next to go to the next step.

Step 5 . Set a password to store the passphrase. If you use this feature, in the future, when performing SXP transactions, you don’t need to enter the passphrase every time you make a transaction, you just need to re-enter this password.

However, SXPViet considers this step unnecessary and can be risky if you set a password and keep it unsafe. So, please leave this box blank and skip, click Next.

Step 5 . You have created the SXP wallet. The application will display the SXP wallet address you just created, the SXP wallet will start with the letter S .

You can give this wallet a name to make it easy to distinguish from other wallets if you use multiple SXP wallet addresses. In this example, the wallet address is named SXPViet.com. Then click on DONE to finish.

You will be redirected to the newly created SXP wallet management page. Here you will see wallet functions such as sending SXP, tracking transactions, ..

At this point, you have successfully created an SXP wallet! If you check this wallet address on Explorer, you will see a message that the wallet address does not exist, this is normal. When the wallet generates the first transaction, it will display the information on Explorer.

Again, please store your passphrase carefully! If the information on this website is helpful to you, consider voting for Delegate arktoshi! Thank you!

Filed Under: Guides Tagged With: create solar wallet, create sxp wallet, solar wallet, sxp address, sxp wallet

Disclaimer

Resources on SXPDirectory.com are not to be interpreted as investment advice or a solicitation of investment unless explicitly stated on that resource. SXPDirectory.com operators are community members and not representative of Solar.org. The accuracy of statements is not guaranteed. SXPDirectory.com does not contain any insider information nor will it ever contact you with offerings of insider information in exchange for money. The SXP token is not a security. SXPDirectory.com website operators and operators of SXPDirectory.com resources likely hold SXP tokens.

Links

  • Twitter
  • Contact
  • SXPViet
  • ArkFah

Guides

  • How to Create SXP Wallet
  • How to Stake SXP, Earn rewards
  • ERC20 BEP20-to-Native SXP Swap Guide

Lastest Blog

  • SXP Directory is officially launched!
  • Fix common issues in Solar Desktop Wallet

Archives

  • May 2022
  • April 2022
  • March 2022
  • Email
  • Twitter

Support this website by voting for Delegate arktoshi.
Buy a VPS with crypto from Evolution Host.
Copyright © 2023 · SXP Directory

en English
ko Koreantr Turkishzh-CN Chinese (Simplified)nl Dutchen Englishfr Frenchde Germanit Italianpt Portugueseru Russianes Spanishvi Vietnamesear Arabic